基于 Hugo 搭建个人博客
1 简介与安装
Hugo 是一个用 Go 编写的静态网站生成器,可以轻松生成个人博客。
Hugo 安装起来也非常方便,以下是 Hugo 的安装命令:
brew install hugo # mac
sudo apt install hugo # Debian
scoop install hugo # windows
Windows 推荐使用 scoop 包管理器,非常好用
安装好 Hugo 后,执行 hugo new site blog 就会在当前目录下创建名为 blog 的目录,Hugo 后续将基于该目录中的内容来创建网站。
2 主题配置
这里介绍了三个个人比较喜欢的 Hugo 主题的配置方案。读者可以自选其一,我是部署了三个博客网站,当然只有一个能被搜索引擎检索到。
2.1 PaperMod
2.1.1 安装主题
在 blog 目录下,执行以下命令:
git submodule add --depth=1 https://github.com/adityatelange/hugo-PaperMod.git themes/PaperMod
git submodule update --init --recursive # needed when you reclone your repo (submodules may not get cloned automatically)
主题就被安装在了 blog/themes/PaperMod 目录下,该目录下就是 PaperMod 主题的源码。
如果要更新主题,在 blog 目录下执行 git submodule update --remote --merge 即可。
在
blog/themes/PaperMod目录下执行git pull origin master也可以更新。
2.1.2 配置文件
Hugo 读取配置文件非常灵活,既可以把所有配置都写在 blog 目录下的 hugo.toml 或者 config.toml 中,也可以在 blog/config/_default 目录下,将 hugo.toml 配置分成几个配置文件来编写,如下所示:
blog/config/_default on main [✘!?]
❯ ls
hugo.toml markup.toml menu.zh.toml outputs.toml params.en.toml params.zh.toml privacy.toml
hugo.en.toml hugo.zh.toml menu.en.toml minify.toml papermod.yml.bak params.toml permalinks.toml services.toml2.1.2.1 基础配置
在 hugo.toml 中,我们可以写入单配置文件下的 config.toml(后简称 config.toml)中的不属于任何 table 的键值对信息,config.toml 中除 languages 外的 table,都可以单独作为一个配置文件。
# blog/config.toml or blog/config/_default/hugo.toml
baseURL = "https://blog.example.com"

# 默认语言为中文,则 xxx.md 与 xxx.zh.md 都会被认为是中文
defaultContentLanguage = "zh"
# 为 true,则路径为 xxx/zh/posts/;为 false,则为 xxx/posts/
defaultContentLanguageInSubdir = true

enableInlineShortcodes = true # 允许使用内联短码
enableEmoji = true            # 允许使用 Emoji
enableRobotsTXT = false       # 允许爬虫抓取到搜索引擎,此处设置不允许
enableGitInfo = true

buildDrafts = false
buildFuture = false
buildExpired = false

paginate = 12 # 每页显示的文章数

theme = "PaperMod"
而 config.toml 中的 langauges table 中的内容,可以写到对应语言的 hugo.${lang}.toml 中,如 hugo.zh.toml,hugo.en.toml 中。如下所示:
# config.toml
[languages]
## 中文
[languages.zh]
languageName = "简体中文"
title = "翼仔的博客"
weight = 1
hasCJKLanguage = true# hugo.zh.toml
weight = 1
# hugo.toml 中 defaultContentLanguage 必须是这些 langaugeCode 中的一项
languageCode = "zh"
languageName = "简体中文"
# 在浏览器标签页显示的网站标题
title = "翼仔"
# whether to include Chinese/Japanese/Korean
hasCJKLanguage = true
# copyright description used only for seo schema
# 版权信息,会显示在页脚,如果不指定 copyright,默认会显示网站标题、hugo、PaperMod
# 如果指定了 copyright,则网站标题不会再在页脚显示
# copyright = "This work is licensed under a Creative Commons Attribution-NonCommercial 4.0 International License."可以看到 config.toml 中的 languages table 与 hugo.zh.toml 的对应关系,[languages.xx] 即对应 langaugeCode = "xx",其他键值对复制过来即可。hugo.en.toml 的处理方法类似。
2.1.3 杂项配置
config.toml 中的 markup、outputs、minify、privacy、services、permalinks 这几个 table 类似:
# config.toml
[markup.goldmark.renderer]
unsafe = true

[minify]
disableXML = true

[permalinks] # 浏览器链接显示方式
post = "/:title/"

[outputs]
home = ["HTML", "RSS", "JSON"]

[privacy.vimeo]
disabled = false
simple = true

[privacy.twitter]
disabled = false
enableDNT = true
simple = true

[privacy.instagram]
disabled = false
simple = true

[privacy.youtube]
disabled = false
privacyEnhanced = true

[services.instagram]
disableInlineCSS = true

[services.twitter]
disableInlineCSS = true# makrup.toml
[goldmark.renderer]
unsafe = true
[highlight]
noClasses = false
codeFences = true
guessSyntax = true
lineNos = true
style = "monokai"
# minify.toml
disableXML = true
# outputs.toml
home = ["HTML", "RSS", "JSON"]
# permalinks.toml
post = "/:title/"
# privacy.toml
[vimeo]
disabled = false
simple = true
[twitter]
disabled = false
enableDNT = true
simple = true
[instagram]
disabled = false
simple = true
[youtube]
disabled = false
privacyEnhanced = true
# services.toml
[instagram]
disableInlineCSS = true
[twitter]
disableInlineCSS = true2.1.4 menu 配置
再然后是 menu table,由于不同语言需要分别设置,故分成 menu.zh.toml 和 menu.en.toml:
[[languages.zh.menu.main]]
identifier = "search"
name = "搜索"
url = "/search/"
weight = 1

[[languages.zh.menu.main]]
identifier = "home"
name = "主页"
url = "/"
weight = 2

[[languages.zh.menu.main]]
identifier = "posts"
name = "文章"
url = "posts"
weight = 3

[[languages.zh.menu.main]]
identifier = "tags"
name = "标签"
url = "tags"
weight = 20

[[languages.zh.menu.main]]
identifier = "archives"
name = "时间线"
url = "archives/"
weight = 40

[[languages.zh.menu.main]]
identifier = "about"
name = "关于"
url = "about"
weight = 50

[[languages.zh.menu.main]]
identifier = "links"
name = "友链"
url = "links"
weight = 60

[[languages.en.menu.main]]
identifier = "search"
name = "Search"
url = "search"
weight = 1

[[languages.en.menu.main]]
identifier = "home"
name = "Home"
url = "/"
weight = 2

[[languages.en.menu.main]]
identifier = "posts"
name = "Article"
url = "posts"
weight = 3

[[languages.en.menu.main]]
identifier = "tags"
name = "Tags"
url = "tags"
weight = 20

[[languages.en.menu.main]]
identifier = "archives"
name = "Archives"
url = "archives/"
weight = 40

[[languages.en.menu.main]]
identifier = "about"
name = "About"
url = "about"
weight = 50# menu.zh.toml
[[main]]
identifier = "search"
name = "搜索"
url = "/search/"
weight = 1
[[main]]
identifier = "home"
name = "主页"
url = "/"
weight = 2
[[main]]
identifier = "posts"
name = "文章"
url = "posts"
weight = 3
[[main]]
identifier = "tags"
name = "标签"
url = "tags"
weight = 20
[[main]]
identifier = "archives"
name = "时间线"
url = "archives"
weight = 40
[[main]]
identifier = "about"
name = "关于"
url = "about"
weight = 50
[[main]]
identifier = "links"
name = "友链"
url = "links"
weight = 60
# menu.en.toml
[[main]]
identifier = "search"
name = "Search"
url = "/search/"
weight = 1
[[main]]
identifier = "home"
name = "Home"
url = "/"
weight = 2
[[main]]
identifier = "posts"
name = "Posts"
url = "posts/"
weight = 3
[[main]]
identifier = "tags"
name = "Tags"
url = "tags"
weight = 20
[[main]]
identifier = "archives"
name = "Archives"
url = "archives/"
weight = 40
[[main]]
identifier = "about"
name = "About"
url = "about/"
weight = 50
[[main]]
identifier = "links"
name = "Links"
url = "links/"
weight = 602.1.5 params 配置
最后是内容最多的 params table,它还有许多 subtable。
[[languages.zh.params.profileMode.buttons]] 与 params.zh.toml 中的 `[[profileMode.butteons]] 对应,依此类推。
# config.toml
[params]
env = "production"           # to enable google analytics, opengraph, twitter-cards and schema
author = "zwyyy456"
defaultTheme = "auto"        # light or dark
disableThemeToggle = false
DateFormat = "2006-01-02"
ShowShareButtons = false
ShowReadingTime = true
disableSpecailistPost = true
displayFullLangName = true
ShowPostNavLinks = true
ShowBreadCrumbs = false # 是否显示文章路径
ShowCodeCopyButtons = true
math = true                  # 数学 latex 支持

ShowAllPagesInArchive = true # archive 显示所有页面

hideFooter = false    # 隐藏页脚
ShowWordCounts = true
VisitCount = true

ShowLastMod = true # 显示文章最后更新时间
ShowToc = true     # 显示目录
TocOpen = true     # 自动展开目录

comments = true
mainSections = "post/tech" # 非 profile mode 显示文章列表

[params.fuseOpts]
isCaseSensitive = false
shouldSort = true
location = 0
distance = 20 # 数值越大,允许匹配的字符距离越远
threshold = 0.4 # 0~1,0 表示完全匹配
minMatchCharLength = 2
keys = ["title", "permalink", "summary"] # 关键词

[params.twikoo]
version = "1.4.11"

# profile mode 中,会直接显示在头像下
[[params.socialIcons]]
name = "github"
url = "https://github.com/zwyyy456"

[[params.socialIcons]]
name = "email"
url = "[email protected]"

[[params.socialIcons]]
name = "RSS"
url = "index.xml"

# 网站默认图标
[params.assets]
favicon = "img/avatar.jpg"
favicon16x16 = "img/avatar.jpg"
favicon32x32 = "img/avatar.jpg"
apple_touch_icon = "img/avatar.jpg"
safari_pinned_tab = "img/avatar.jpg"
disableHLJS = true               # 启用 chroma 主题

# 博客网站左上角的标题与图片
[languages.zh.params.label]
text = "翼仔的博客"
icon = "img/zwy_lake.jpg"
iconHeight = 35

[languages.zh.params.profileMode]
enabled = true
title = "何以解忧"
subtitle = "快乐的时光总是短暂的"
imageUrl = "img/Quirrel.jpg"
imageWidth = 150
imageHeight = 150

# 在 profileMode 为 true 的情况下,显示在 socialIcon 下的按钮
[[languages.zh.params.profileMode.buttons]]
name = "技术"
url = "posts/tech"

[[languages.zh.params.profileMode.buttons]]
name = "阅读"
url = "posts/read"

[[languages.zh.params.profileMode.buttons]]
name = "我们"
url = "posts/life"

[[languages.zh.params.profileMode.buttons]]
name = "分类"
url = "categories"

[languages.en.params.label]
text = "zwyyy456's blog"
icon = "img/zwy_lake.jpg"
iconHeight = 35

[languages.en.params.profileMode]
enabled = true
title = "zwyyy456"
subtitle = "Sometimes naive, always on the way"
imageUrl = "img/Quirrel.jpg"
imageWidth = 150
imageHeight = 150

[[languages.en.params.profileMode.buttons]]
name = "Tech"
url = "posts/tech"

[[languages.en.params.profileMode.buttons]]
name = "Read"
url = "posts/read"

[[languages.en.params.profileMode.buttons]]
name = "We"
url = "posts/life"

[[languages.en.params.profileMode.buttons]]
name = "Categories"
url = "categories"# params.toml
env = "production" # to enable google analytics, opengraph, twitter-cards and schema
author = "zwyyy456"
defaultTheme = "auto" # light or dark
disableThemeToggle = false
DateFormat = "2006-01-02"
ShowShareButtons = false
ShowReadingTime = true
disableSpecailistPost = true
displayFullLangName = true
ShowPostNavLinks = true
ShowBreadCrumbs = false # 顶栏显示当前路径
ShowCodeCopyButtons = true
math = true # 数学 latex 支持
ShowAllPagesInArchive = true # archive 显示所有页面
hideFooter = false # 隐藏页脚
ShowWordCounts = true
VisitCount = true
# ShowLastMod = true # 显示文章最后更新时间
ShowToc = true # 显示目录
TocOpen = true # 自动展开目录
comments = true
[assets]
favicon = "img/avatar.jpg"
favicon16x16 = "img/avatar.jpg"
favicon32x32 = "img/avatar.jpg"
apple_touch_icon = "img/avatar.jpg"
safari_pinned_tab = "img/avatar.jpg"
disableHLJS = true # 启用 chroma 主题
[fuseOpts]
isCaseSensitive = false
shouldSort = true
location = 0
distance = 20
threshold = 0.4
minMatchCharLength = 2
keys = ["title", "permalink", "summary"] # 关键词
[twikoo]
version = "1.4.11"
# params.zh.toml
[label]
text = "翼仔的博客"
icon = "img/zwy_lake.jpg"
iconHeight = 35
# 在 profileMode 为 false 时才有用
[homeInfoParams]
Title = "PaperMods's Demo"
Content = '''
👋 Welcome to demo page of Hugo's theme PaperMod!
- **PaperMod** is designed to be clean and simple but fast and responsive theme with useful feature-set that enhances UX.
- Feel free to show your support by giving us a star 🌟 on GitHub and sharing with your friends and social media .
- PaperMod is based on theme [Paper](https://github.com/nanxiaobei/hugo-paper/tree/4330c8b12aa48bfdecbcad6ad66145f679a430b3).
'''
[profileMode]
enabled = true
title = "何以解忧"
subtitle = "快乐的时光总是短暂的"
imageUrl = "img/Quirrel.jpg"
imageWidth = 150
imageHeight = 150
[[socialIcons]]
name = "github"
url = "https://github.com/zwyyy456"
[[socialIcons]]
name = "email"
url = "[email protected]"
[[socialIcons]]
name = "RSS"
url = "index.xml"
[[profileMode.buttons]]
name = "技术"
url = "posts/tech"
[[profileMode.buttons]]
name = "阅读"
url = "posts/read"
[[profileMode.buttons]]
name = "生活"
url = "posts/life"
[[profileMode.buttons]]
name = "分类"
url = "categories"
# params.en.toml
[label]
text = "zwyyy456's blog"
icon = "img/zwy_lake.jpg"
iconHeight = 35
[profileMode]
enabled = true
title = "zwyyy456"
subtitle = "Sometimes naive, always on the way."
imageUrl = "img/Quirrel.jpg"
imageWidth = 150
imageHeight = 150
[[socialIcons]]
name = "github"
url = "https://github.com/zwyyy456"
[[socialIcons]]
name = "email"
url = "zwyyy456@hotmail.com"
[[socialIcons]]
name = "RSS"
url = "index.xml"
[[profileMode.buttons]]
name = "Tech"
url = "posts/tech"
[[profileMode.buttons]]
name = "Read"
url = "posts/read"
[[profileMode.buttons]]
name = "Life"
url = "posts/life"
[[profileMode.buttons]]
name = "Categories"
url = "categories"2.1.6 友链设置
首先在 blog/layouts/shortcodes 目录下创建一个 friend.html 文件,在其中添加以下内容:
{{- if .IsNamedParams -}}
<a target="_blank" href={{ .Get "url" }} title={{ .Get "name" }} class="friendurl">
  <div class="frienddiv">
    <div class="frienddivleft">
      <img class="myfriend" src={{ .Get "logo" }} />
    </div>
    <div class="frienddivright">
      <div class="friendname">{{- .Get "name" -}}</div>
      <div class="friendinfo">{{- .Get "word" -}}</div>
    </div>
  </div>
</a>
{{- end }}
然后在 assets/css/extended/blank.css 中添加如下内容:
.friendurl {
    text-decoration: none !important;
    color: black;
    box-shadow: none !important;
}

.myfriend {
    width: 56px !important;
    height: 56px !important;
    border-radius: 50%!important;
    padding: 2px;
    margin-top: 20px !important;
    margin-left: 14px !important;
    background-color: #fff;
}

.frienddiv {
    overflow: auto;
    height: 100px;
    width: 49%;
    display: inline-block !important;
    border-radius: 5px;
    background: none;

    -webkit-transition: all ease-out 0.3s;
    -moz-transition: all ease-out 0.3s;
    -o-transition: all ease-out 0.3s;
    transition: all ease-out 0.3s;
}

.dark .frienddiv:hover {
    background: var(--code-bg);
}

.frienddiv:hover {
    background: var(--theme);
    transition: transform 1s;
    webkit-transform: scale(1.1);
    -moz-transform: scale(1.2);
    -ms-transform: scale(1.2);
    -o-transform: scale(1.2);
    transform: scale(1.1);
}

.frienddiv:hover .frienddivleft img {
    transition: 0.9s !important;
    -webkit-transition: 0.9s !important;
    -moz-transition: 0.9s !important;
    -o-transition: 0.9s !important;
    -ms-transition: 0.9s !important;
    transform: rotate(360deg) !important;
    -webkit-transform: rotate(360deg) !important;
    -moz-transform: rotate(360deg) !important;
    -o-transform: rotate(360deg) !important;
    -ms-transform: rotate(360deg) !important;
}

.frienddivleft {
    width: 92px;
    float: left;
    margin-right: -5px;
}

.frienddivright {
    margin-top: 18px;
    margin-right: 18px;
}

.friendname {
    text-overflow: ellipsis;
    font-size: 100%;
    margin-bottom: 5px;
    color: var(--primary);
}

.friendinfo {
    text-overflow: ellipsis;
    font-size: 70%;
    color: var(--primary);
}

@media screen and (max-width: 600px) {
    .friendinfo {
        display: none;
    }
    .frienddivleft {
        width: 84px;
        margin: auto;
    }
    .frienddivright {
        height: 100%;
        margin: auto;
        display: flex;
        align-items: center;
        justify-content: center;
    }
    .friendname {
        font-size: 18px;
    }
}
然后在 links.md 或者 link.en.md 中填写内容即可。
2.1.7 添加 Latex 支持
在 blog/layouts/partials 目录下创建 math.html 文件,文件内容如下
<link rel="stylesheet" href="https://cdn.jsdelivr.net/npm/[email protected]/dist/katex.min.css" integrity="sha384-bYdxxUwYipFNohQlHt0bjN/LCpueqWz13HufFEV1SUatKs1cm4L6fFgCi1jT643X" crossorigin="anonymous">
<script defer src="https://cdn.jsdelivr.net/npm/[email protected]/dist/katex.min.js" integrity="sha384-Qsn9KnoKISj6dI8g7p1HBlNpVx0I8p1SvlwOldgi3IorMle61nQy4zEahWYtljaz" crossorigin="anonymous"></script>
<script defer src="https://cdn.jsdelivr.net/npm/[email protected]/dist/contrib/auto-render.min.js" integrity="sha384-+VBxd3r6XgURycqtZ117nYw44OOcIax56Z4dCRWbxyPt0Koah1uHoK0o4+/RRE05" crossorigin="anonymous"></script>
<script>
    document.addEventListener("DOMContentLoaded", function() {
        renderMathInElement(document.body, {
          // customised options
          // • auto-render specific keys, e.g.:
          delimiters: [
              {left: '$$', right: '$$', display: true},
              {left: '$', right: '$', display: false},
              {left: '\\(', right: '\\)', display: false},
              {left: '\\[', right: '\\]', display: true}
          ],
          // • rendering keys, e.g.:
          throwOnError : false
        });
    });
</script>
将 blog/themes/PaperMod/layouts/partials 目录下的extend_head.html 文件复制到 blog/layouts/partials/extend_head.html 下
{{ if or .Params.math .Site.Params.math }}
{{ partial "math.html" . }}
{{ end }}
2.1.8 设置侧边显示目录
3 部署博客
Hugo 博客可以很容易的部署到 Vercel 或者 Netlify 上,二者均免费。
3.1 部署至 Vercel
首先在 blog/ 目录下创建 vercel.json 文件,添加以下内容:
{
"github": {
"silent": true
}
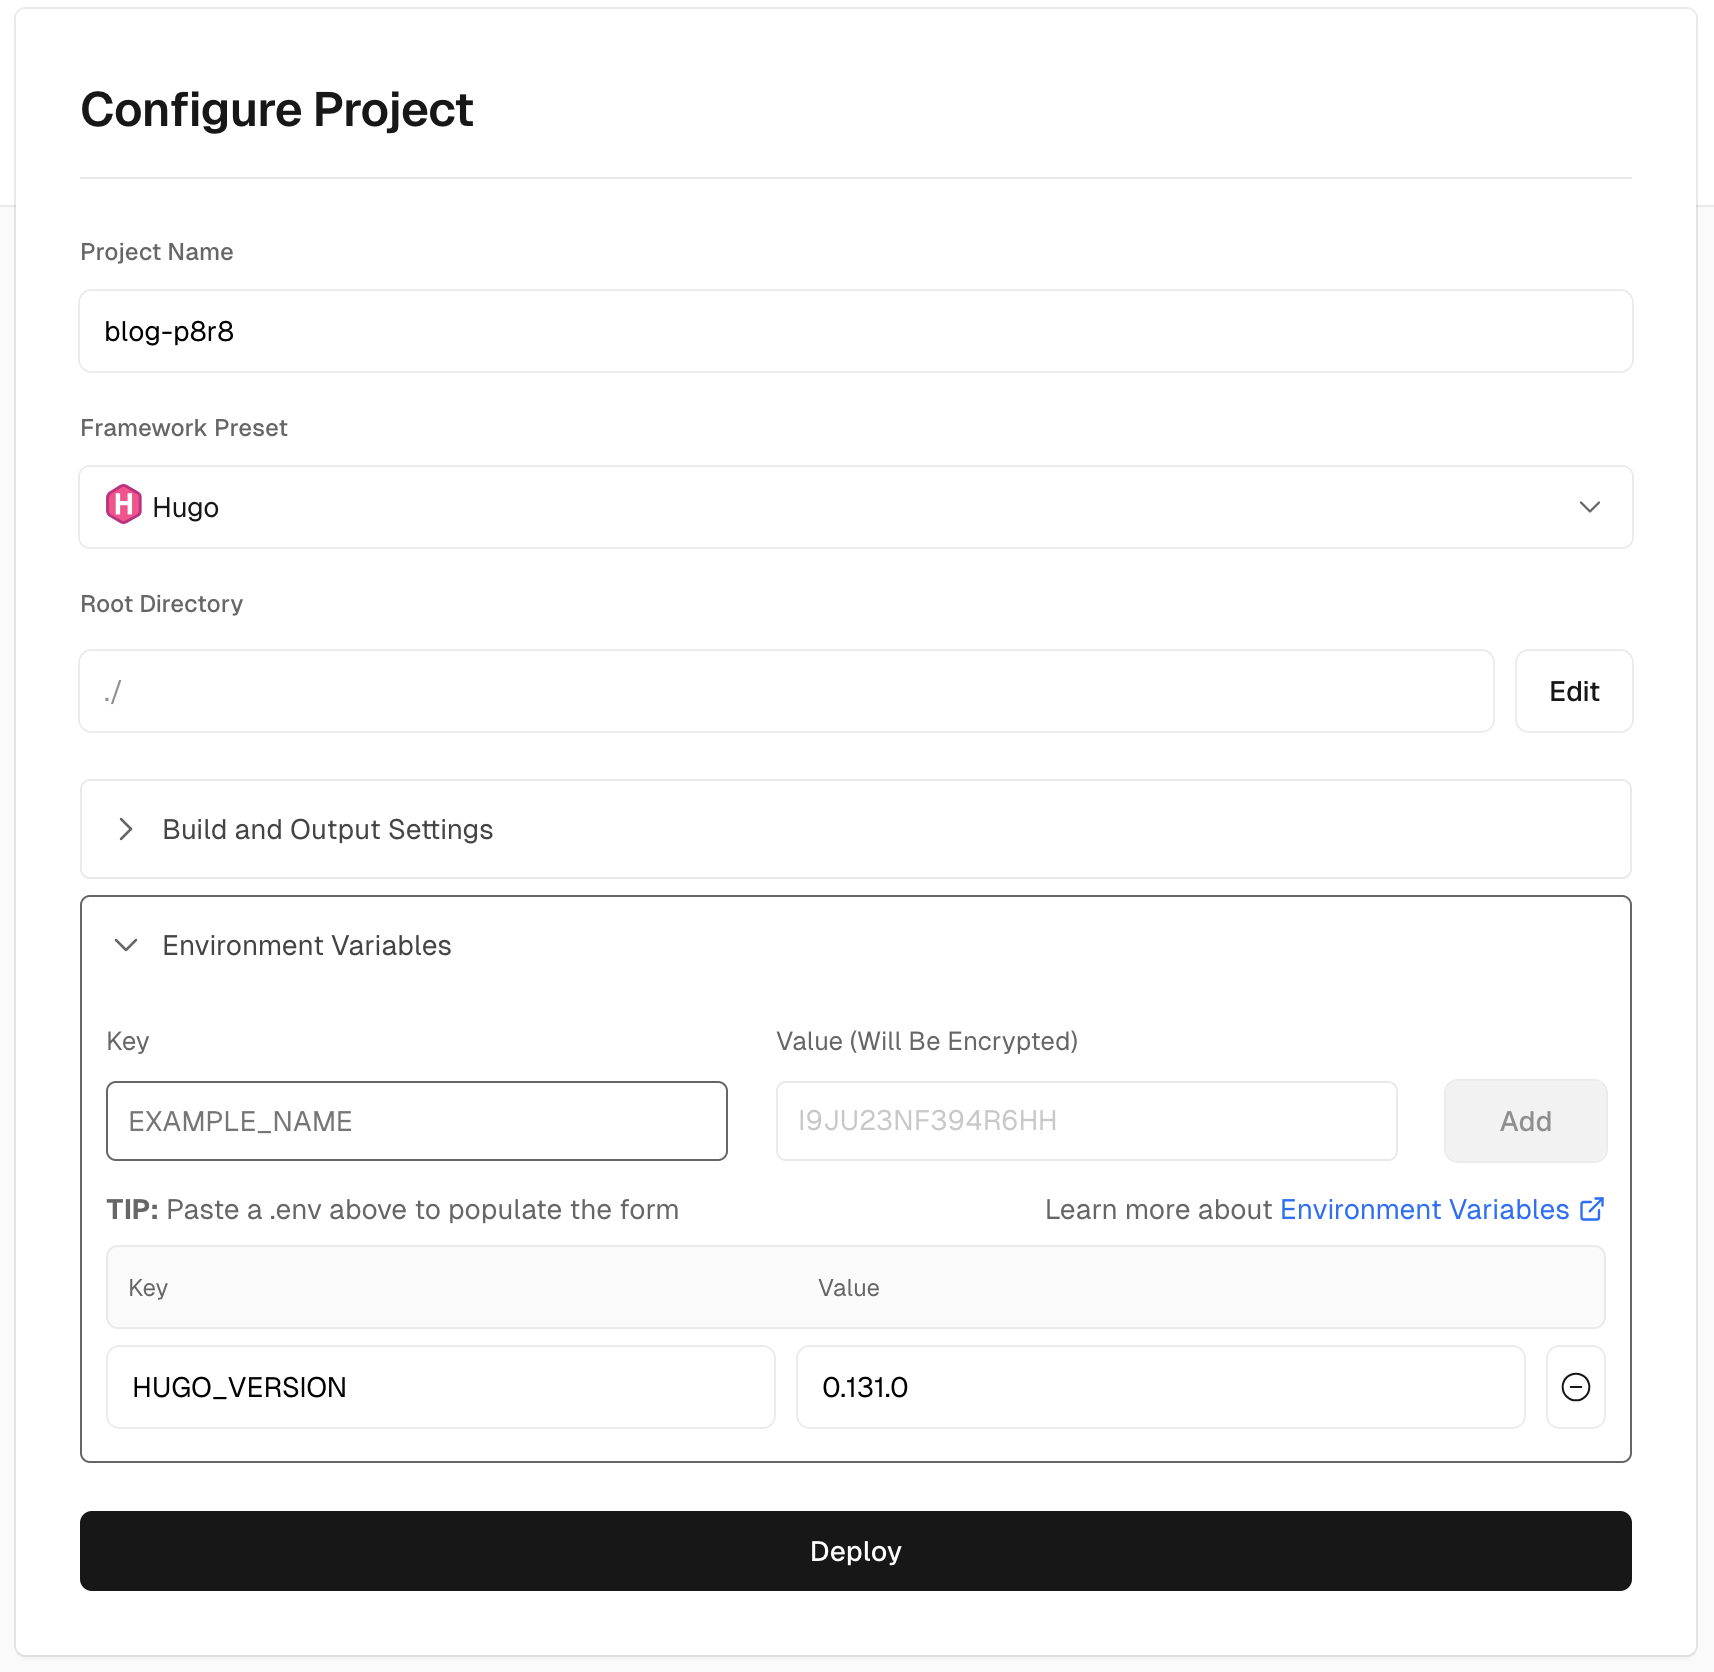
}将这个博客项目 push 到 GitHub,然后 Vercel 添加新项目,选择从 Import Git Repository,注意 GitHub App 权限问题,添加该项目,然后 Framework Preset 选择 Hugo,Environment Variables 设置 Key 为 HUGO_VERSION,Value 设置为当前最新 hugo 的版本号。
如下图所示,点击 Deploy 即可: